How to Change Colors in a PowerPoint Presentation

Choosing colors is quite important when creating a presentation. In deed, you must adapt the hues depending on the topic and your audience. In this post, we are going to learn how to work with colors in your PowerPoint template.
Remember that our templates are 100% editables! You can change the color of all their elements!
How to change the color of themes
If you have read a little bit about how to choose hues for your presentation, you may have made your mind about the colors you want to employ. Are you willing to create your own color palette? Remember that our templates already include their own color palettes.
- Go to View, in the toolbar, and select Slide master.
- Look for the section Colors, and then click on Customize Colors…
- A dropdown menu with different options will appear
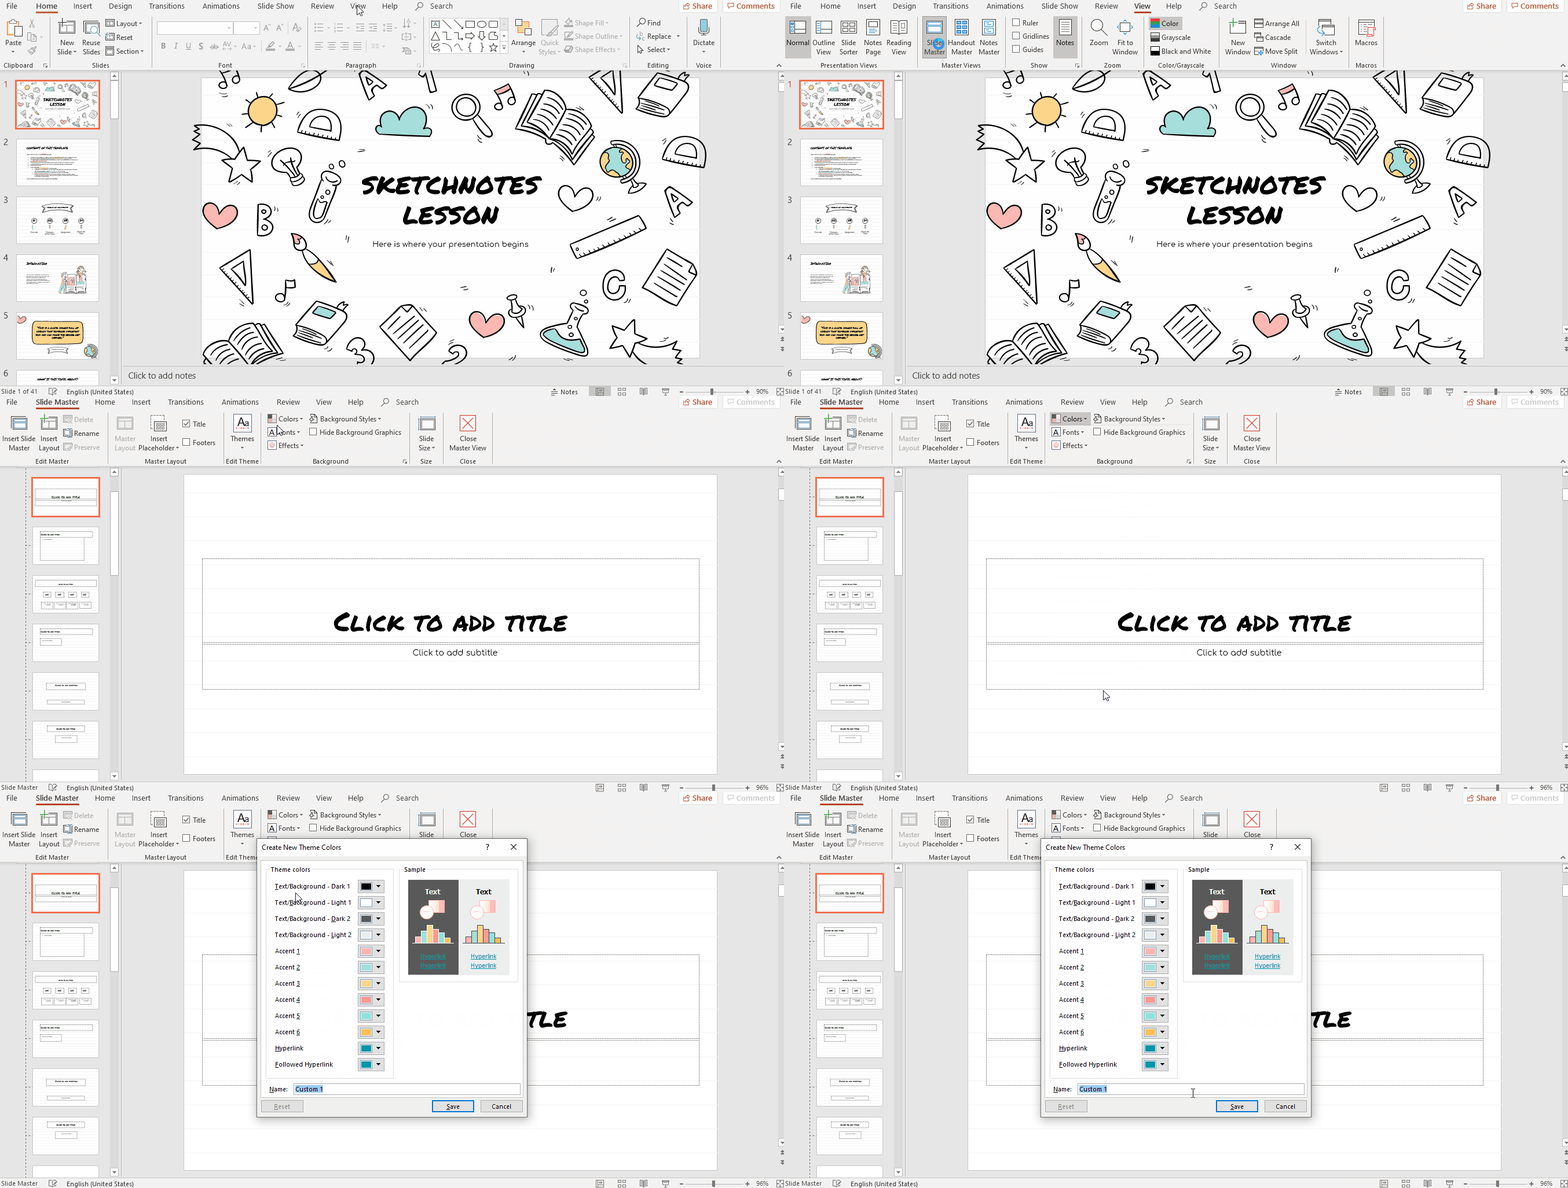
- Let’s have a look at the sections in the menu: Text/Background-Light (1, 2), Text/Background-Dark (1,2), Accent (1-6), Hyperlink and Followed hyperlink.
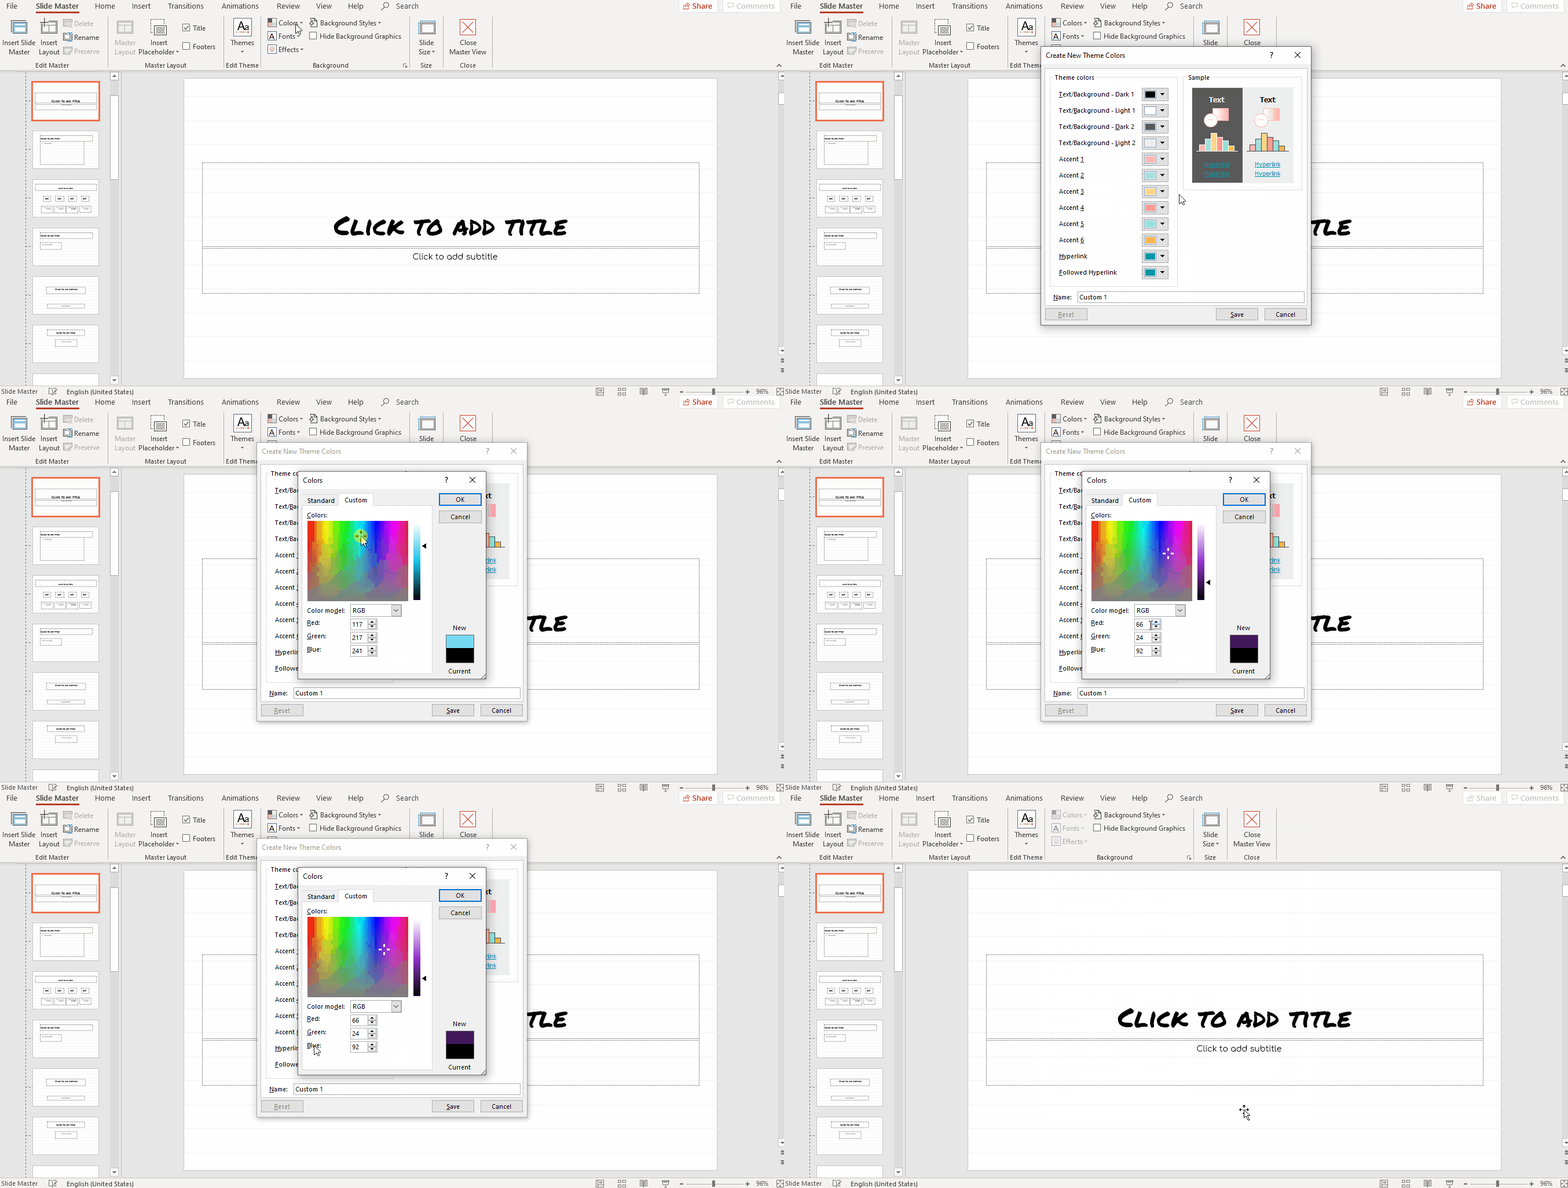
- If you click on the color square close to the sections, a series of hues will appear. Note that it also includes the Theme colors.
- To add a custom color to the section, you need to click on More colors.
- There, you will encounter two different tabs: Standard and Custom.
- In Standard, there is a hexagon with different colors plus a square that shows the current color and the new one. It works as a comparative. In the hexagon, click on any color and then click OK → Save.
- If you prefer any other tone, instead of choosing between the ones that the hexagon offers, click on the Custom tab.
- Here, you can enter a hex code or simply play around with the picker. In Color mode, you can choose RGB or HSL. In RGB, you can add the number of Red, Green and Blue bits there (i.e., you’ll need to insert the hex code manually, adding the needed number of bits per color). In HSL, you need to work with Hue, Saturation and Lightness. When you finish, click OK → Save.
- The new color is now applied to all the elements that had the Text/Background-Dark 1 hue! Of course, we have used the Text/Background-Dark 1 as an example. Choose the one you need!
- Click on Close Master View (upper right corner) when you finish.
Appling colors and gradients: texts, vectors and backgrounds
Let’s stop for a moment. Do you remember the color sections that we have mentioned? Text/Background-Light (1, 2), Text/Background-Dark (1,2), Accent (1-6), Hyperlink and Followed hyperlink. Have a look at the previous section!
Although those are default names, the hyperlinks section is different. If you want to change hyperlink colors in PowerPoint, you need to make use of this section. If you change its color, all the links you add will appear in this hue!
In any case, all the color sections are applied to different elements: backgrounds, vectors, texts… If you change the color of one section, It will be automatically applied to all the elements with such tone.
Do you want to learn more about applying those colors to text?
- First of all, if Formatting Texts is not your cup of tea, it’s time to learn a little bit more about it!
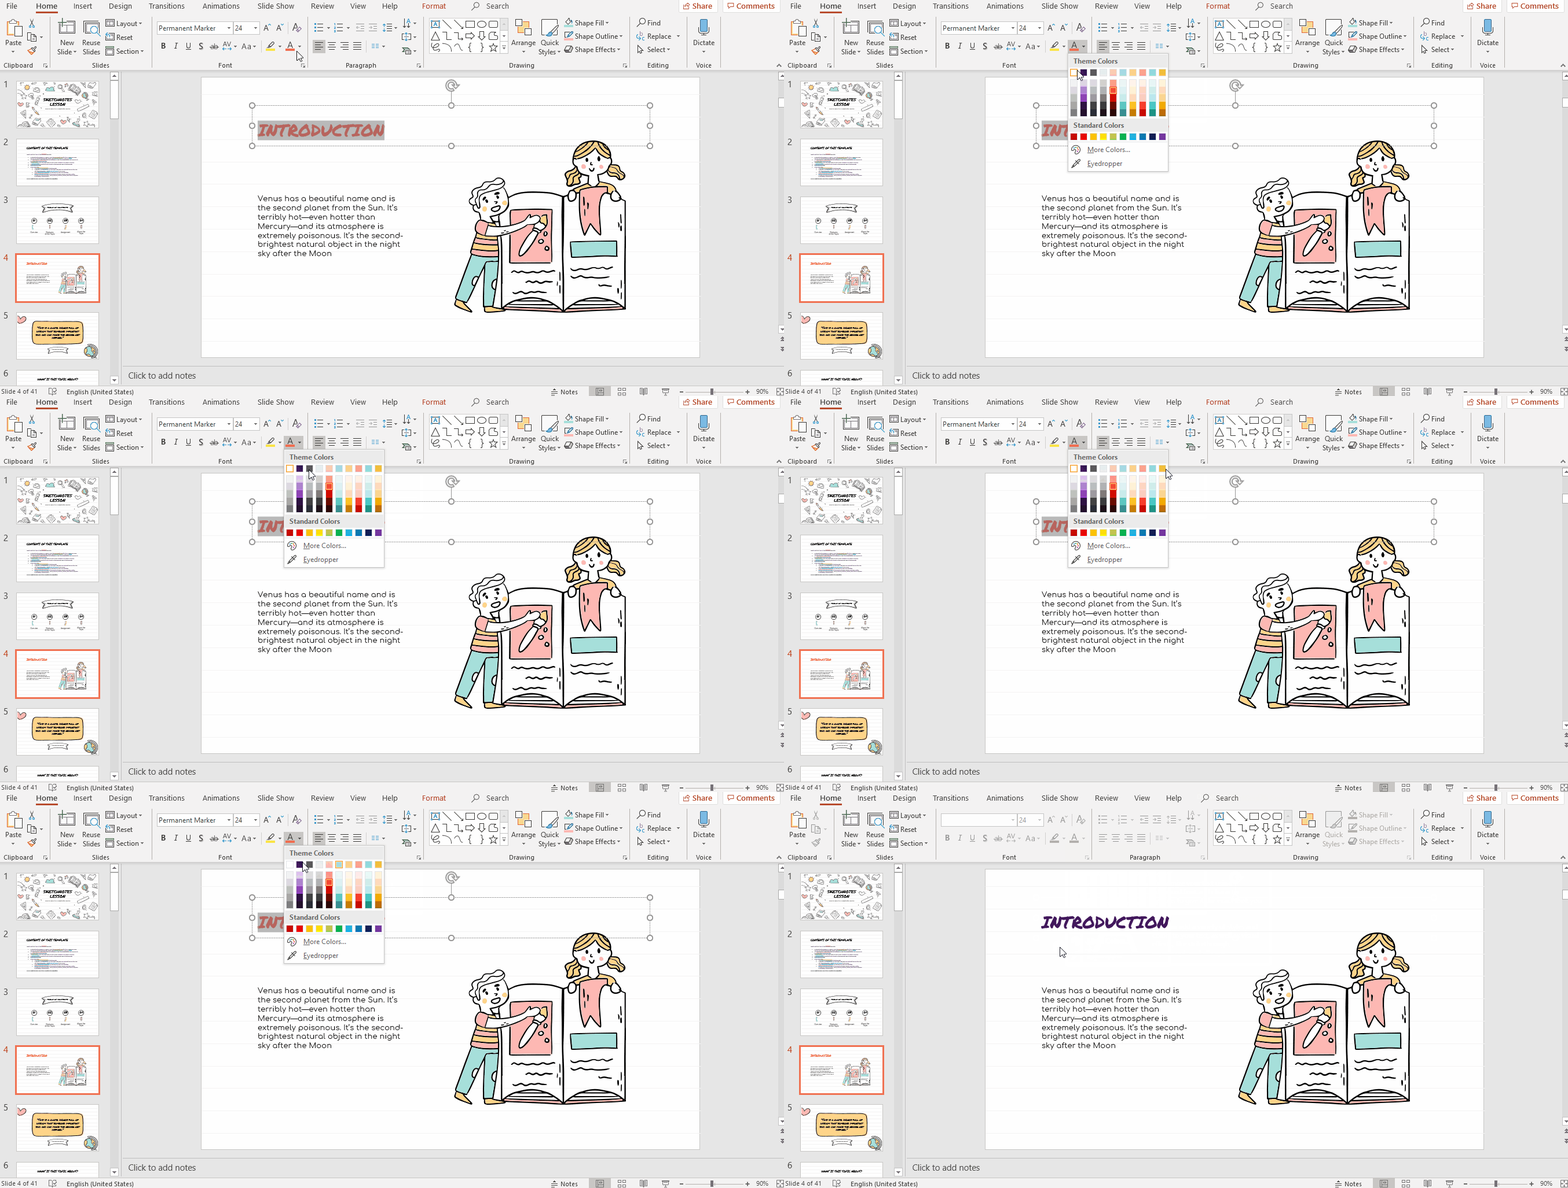
- If you have read the tutorial, decide the typefaces you are going to use! Apply them. For changing the color, select your text. In the toolbar, click on Font color.
The first row of colors correspond to Theme Colors. Choose any of them!
Let’s focus on changing the color of vectors. They can be part of the master slides, but let’s begin with those that are not part of the master.
Now, we will focus on vectors that are not part of the master slide:
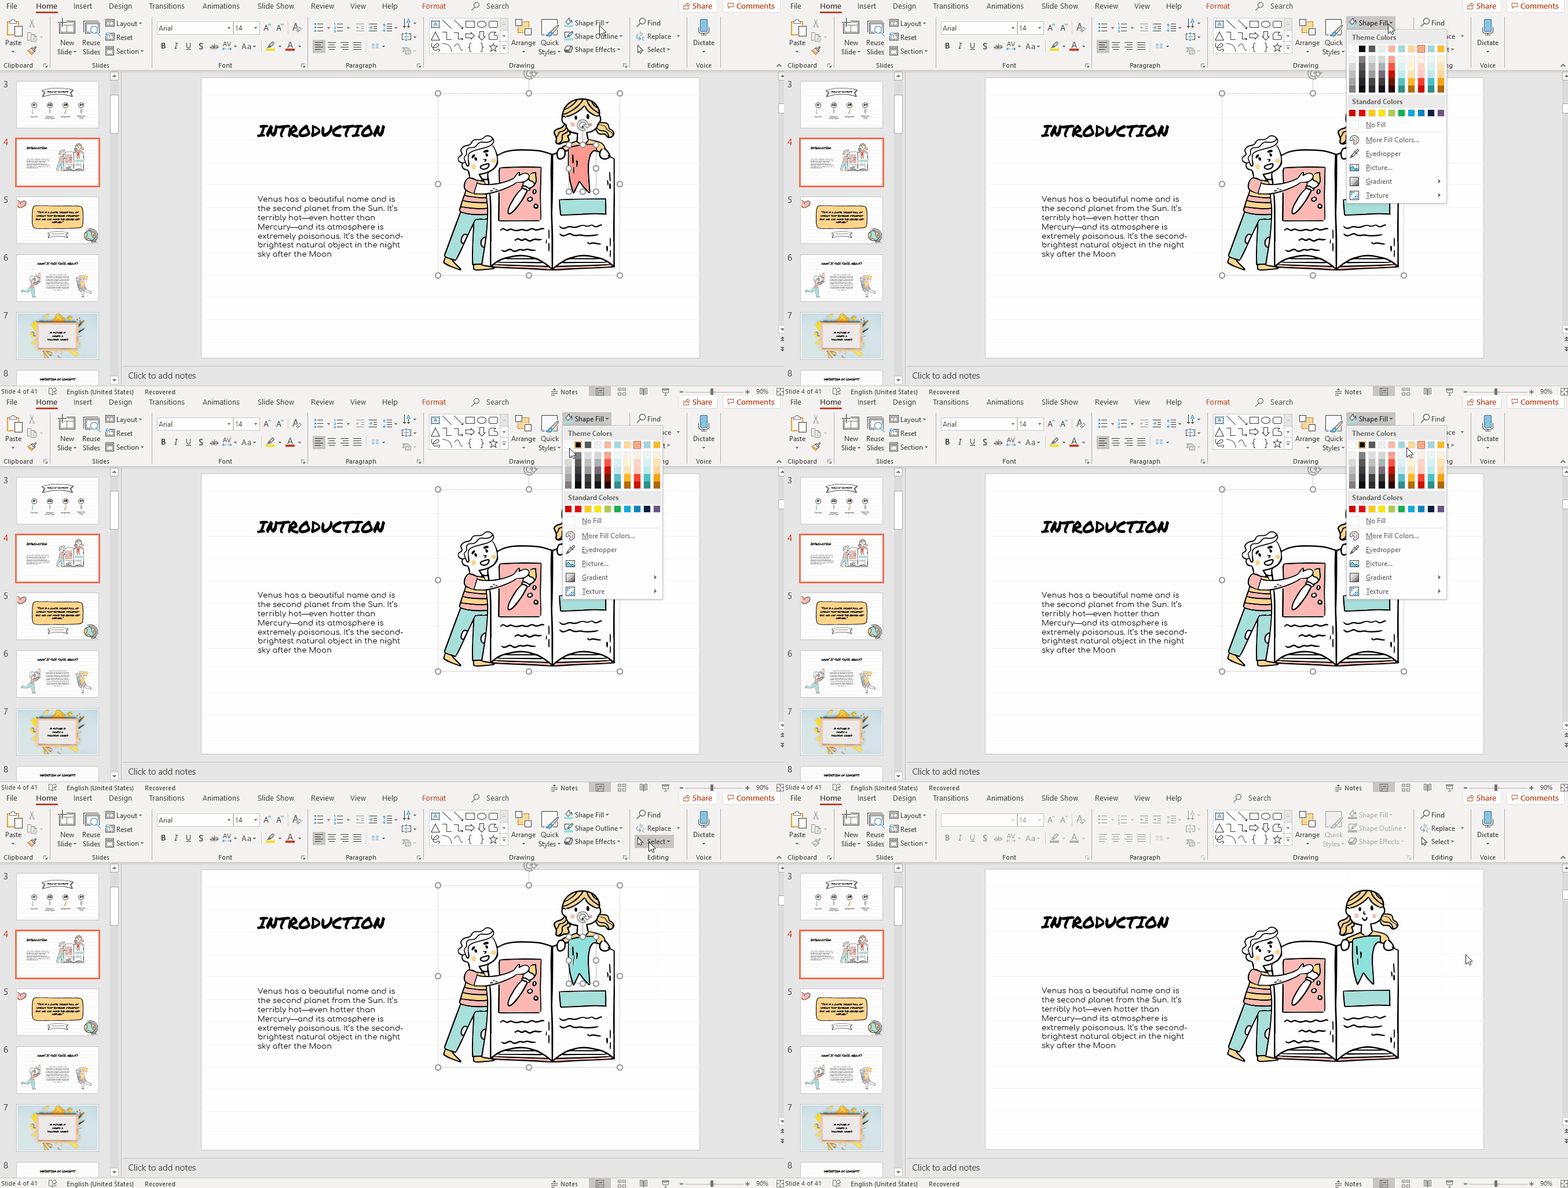
- Did you find an element in an image and you want to change it? Cool! Click on the image and, then, on the element.
- Click on Shape Fill.
- Choose a Theme color (the first row of hues).
- Done!
If the vector you want to change in the master slides, you can change it as well.
- Click on View in the toolbar → Slide Master.
- Find the vector you want to change.
- Double click on it, and then right click → Fill. Select a color from the first row, the ones belonging to the theme. If you need it, you can also change the Outline.
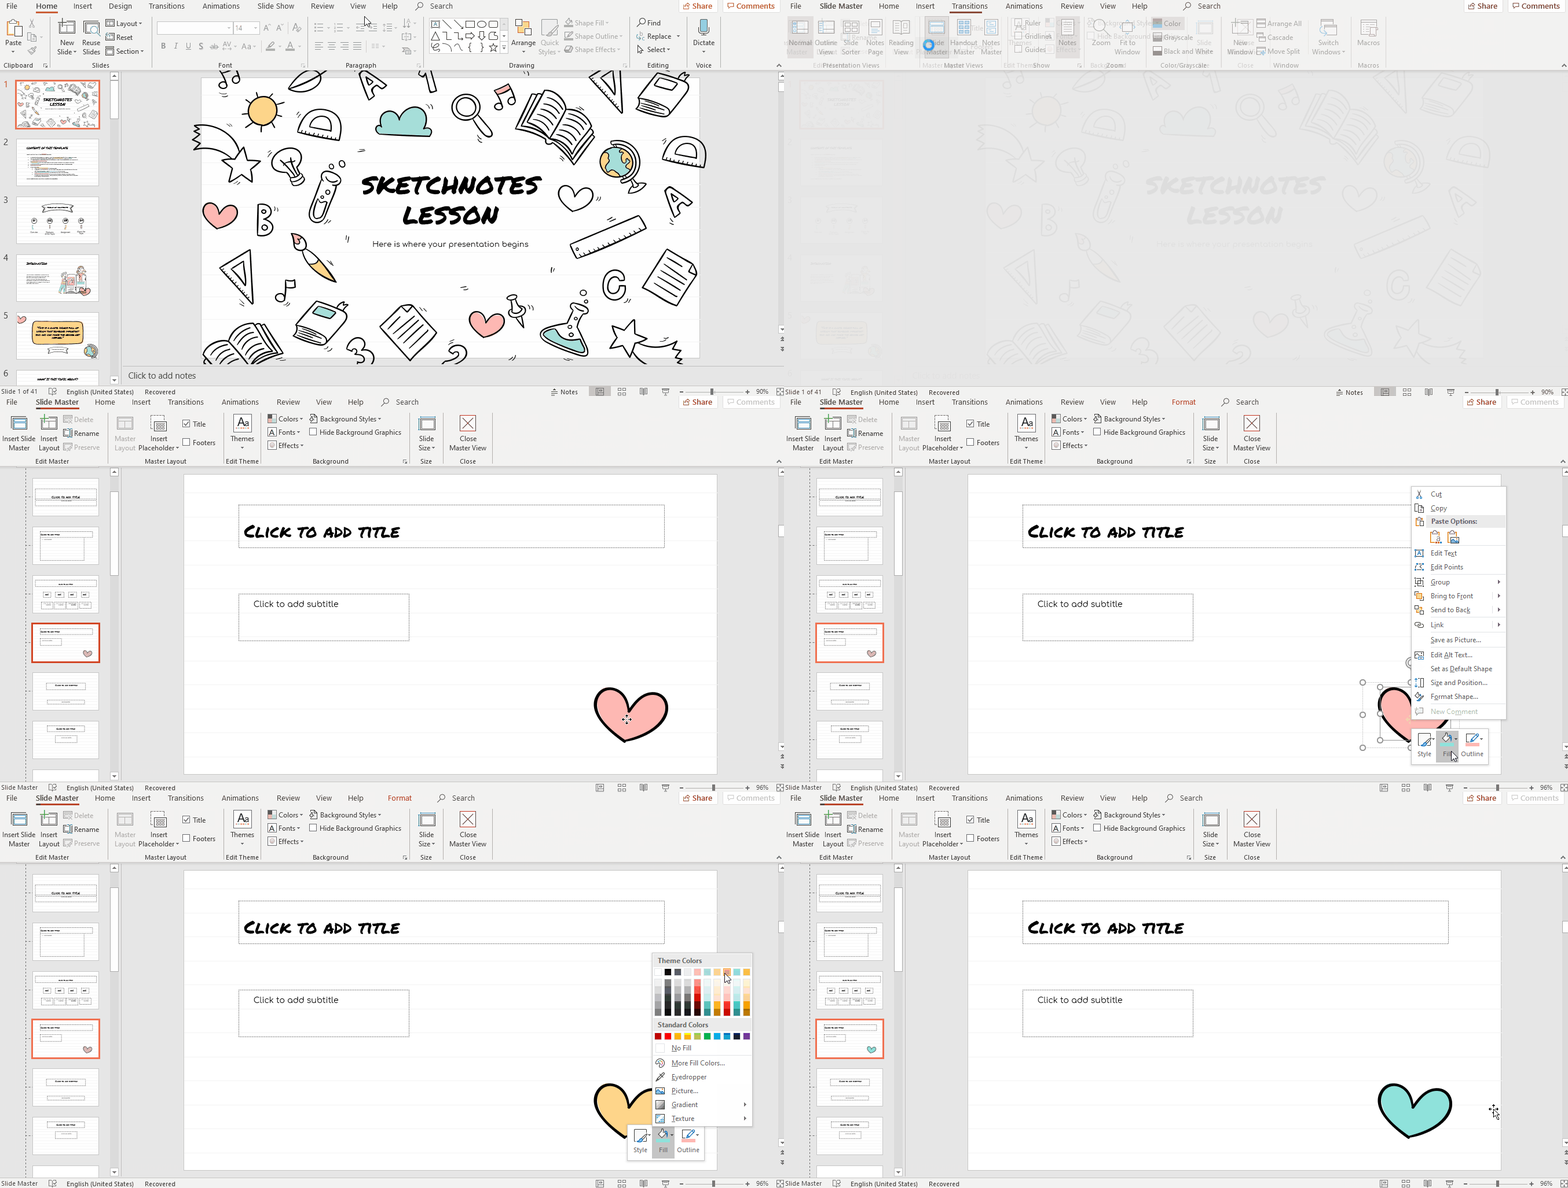
- Click on the first slide and select Close Master View.

Of course, you can change the background color:
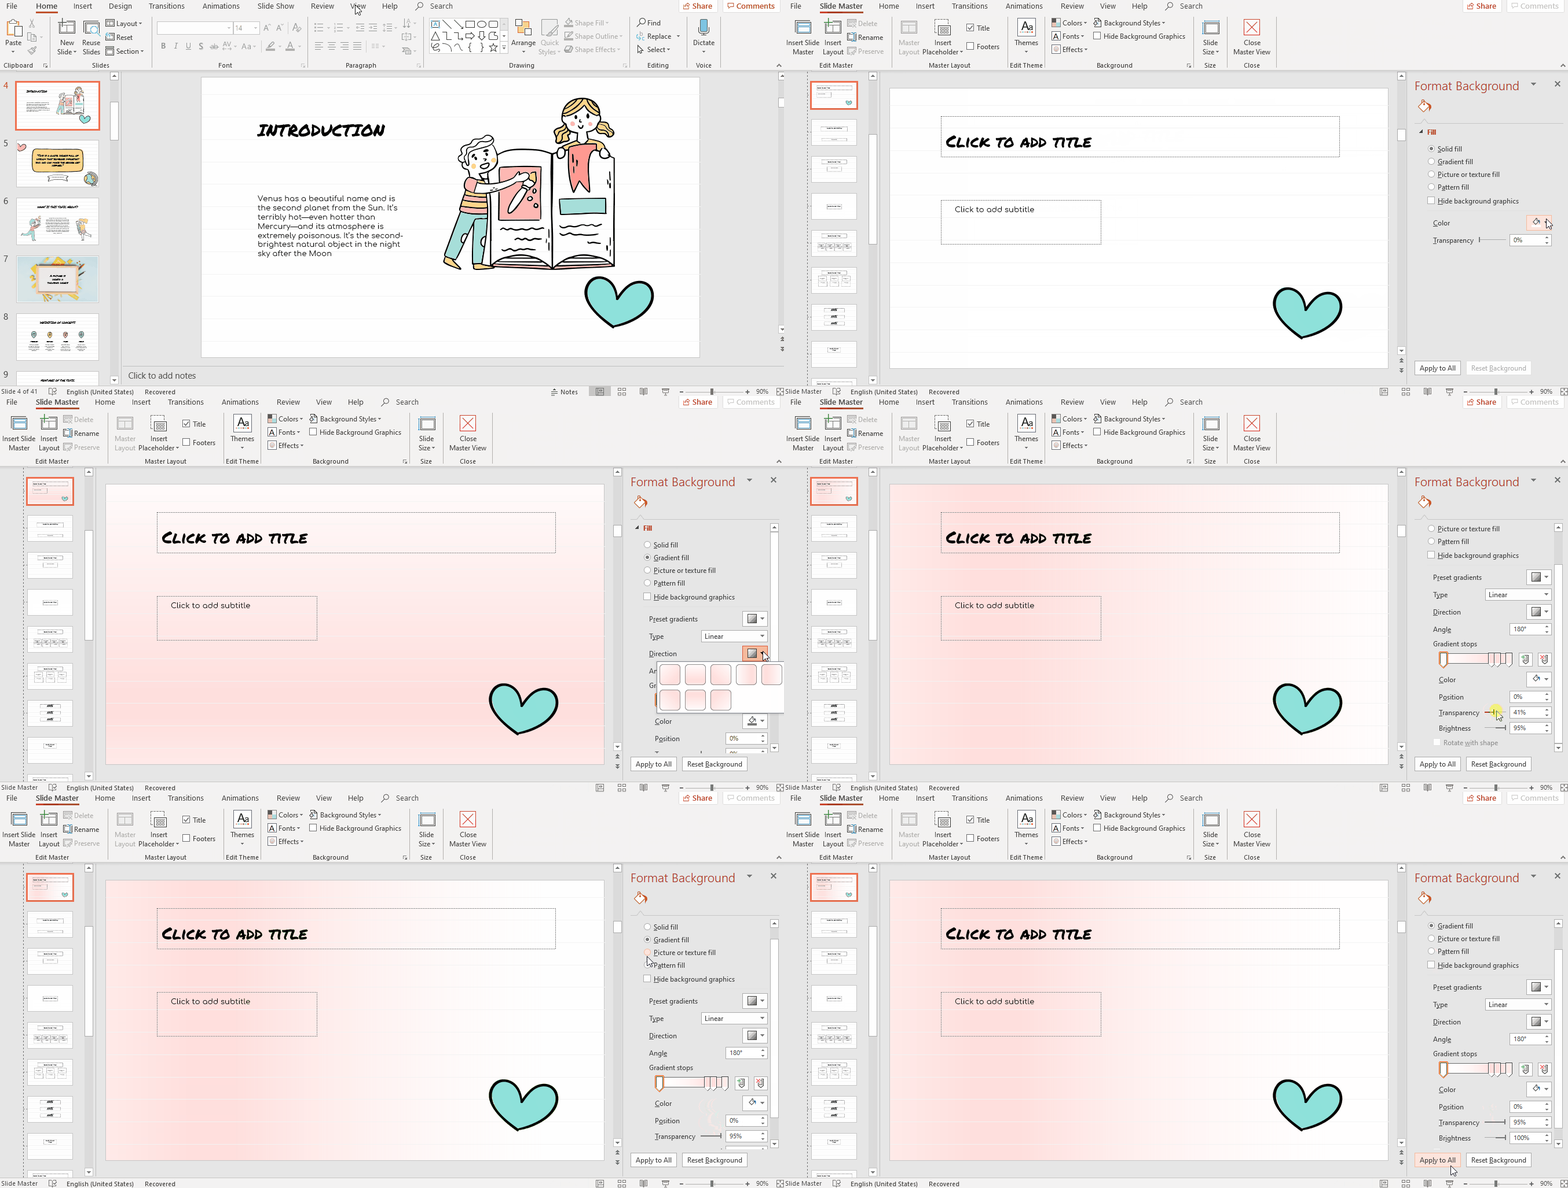
- In the toolbar, go to View → Slide Master.
- Then, click on Background Styles → Format Background.
- You have different colors, styles and the like, Let’s explore them.
- In Solid Fill, you can choose the Color and the level of Transparency.
- Do you like gradients? Cool! Click on Gradient Fill. There, you have different options you can choose from: Preset gradients, Type (Linear, Radial, Rectangular...), Direction, Angle, Gradient, Stop, Color, Position, Transparency and Brightness.
- In addition, you could add a picture or textures in the background. Click on Picture or texture fill. Choose its transparency, the picture or texture!
- If you prefer adding a pattern in the background, click on Pattern fill. Choose the one you like the most and select a Foreground and Background color.
- Finished? Click Apply to all. Then, go to the first slide and click on Close Master View.
How to edit color: gradients and transparencies
As seen above, you can apply transparencies to your background, but you can use them with shapes and vectors as well. Let’s learn how to do so!
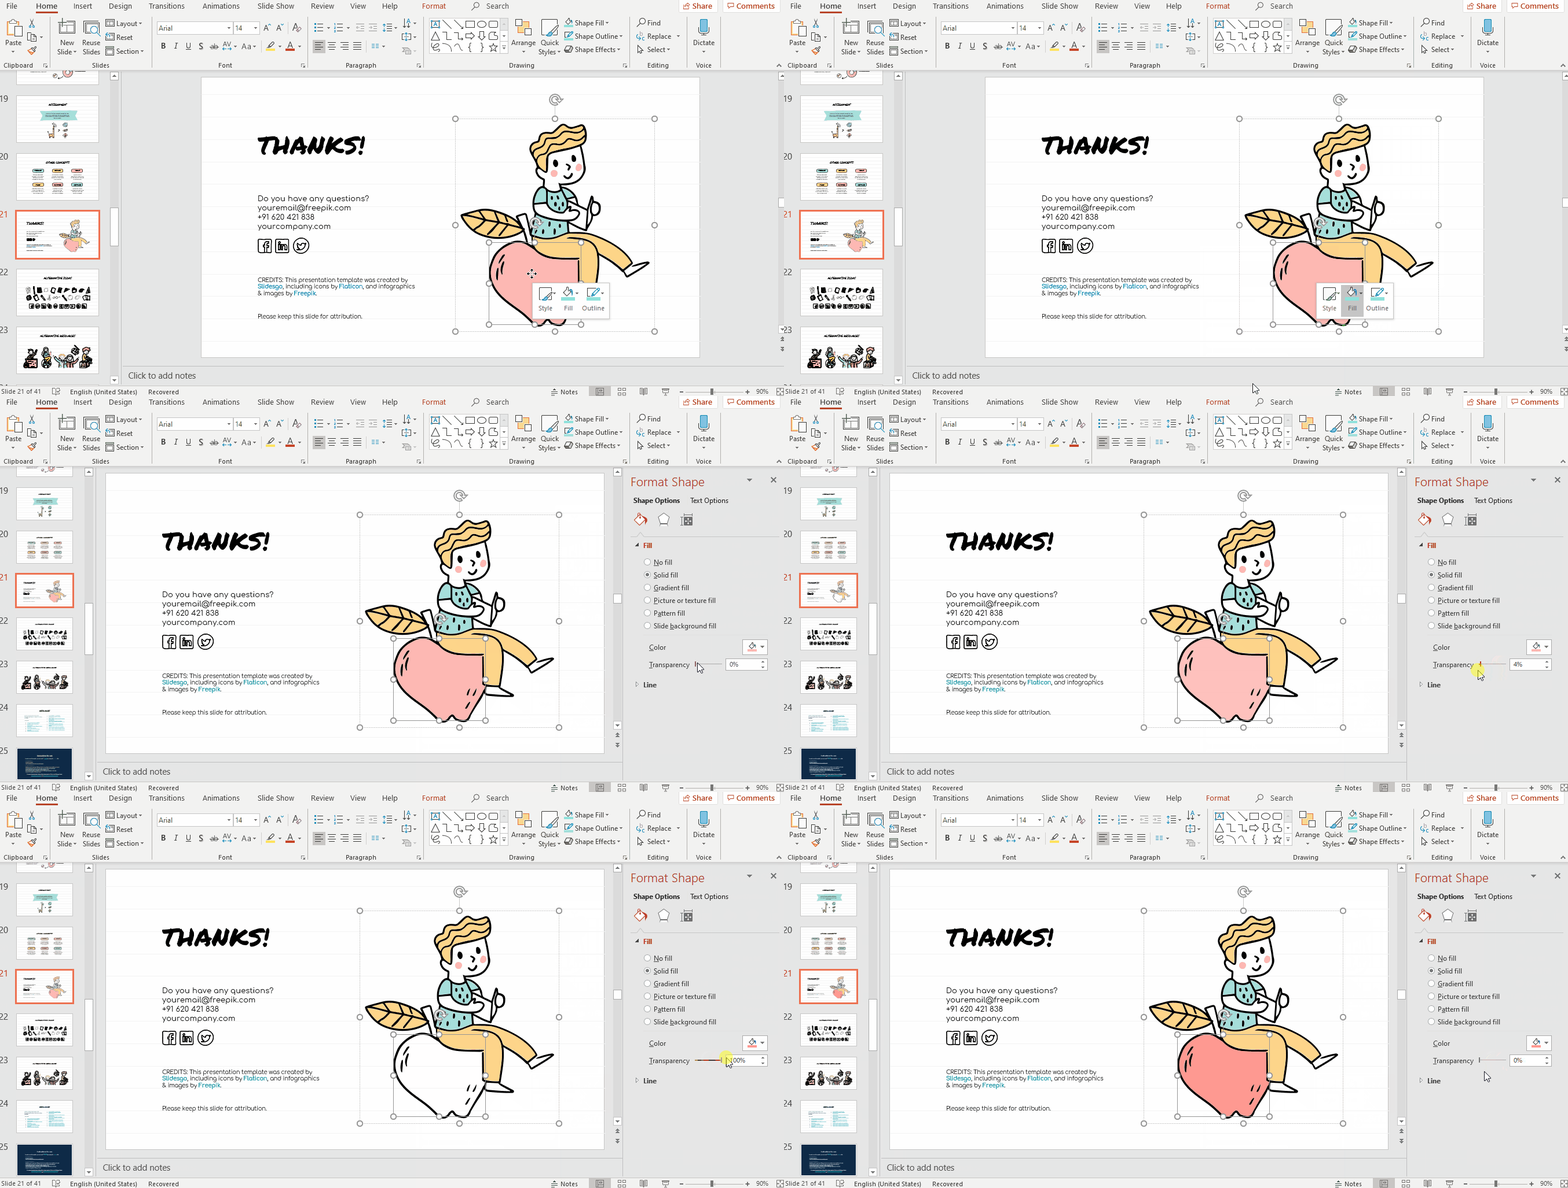
- First, click on the preferred image and once again on the element you want to change.
- Right click on the element → Fill → Gradients.
- Click on More gradients.
- In Fill, make sure that Solid option is marked. Then, choose the preferred transparency.
- Done!
Downloading and editing a color variant
We include some color variants for different templates. Would you like to learn how to download them?
First of all, go to our webpage and look for a theme you like. If it has variants, they include bubbles in different colors.
- To go to the main page of the template, click on its title.
- On the right side, there are some Themes. Under it, click on each of the bubbles to see a preview of the variants.
- Choose Download a PowerPoint template.
- Done! Now go ahead and edit the template as above!

→ Did you like the Sketchnotes Lesson theme and the E-Learning Presentation? Try them now, they’re free and 100% editable!!
Rock the theme colors in your PowerPoint presentation!
Tags
Edit & FormatDo you find this article useful?
Related tutorials

New feature available: edit our templates with Canva
Whenever you need to create, Slidesgo is there. We’re continually enhancing your presentation design process with templates that are primed to impress for any occasion. And in order to let your ideas flow best, comfort is key. How could Slidesgo help you with this? By making you feel right at home with...

How to print PowerPoint notes
Crafting an impactful PowerPoint slideshow and delivering a captivating presentation are distinct skills. The first focuses on designing appealing visuals to convey a clear message, while the second involves employing effective presentation techniques to ensure the audience grasps the idea. The content of this article will help you with the latter...

Discover Our Online Presentation Software for Free
We have great news for you today! If you’ve been a Slidesgo fan for years (or months, or weeks, or days, or mere hours, we welcome everyone!), you’ll probably know for now that our templates are available mostly in two formats: for use in Google Slides and PowerPoint.Google Slides is a...

Webinar: Presentation Audit
With more than 15,000 templates released on Slidesgo and a user base composed of millions of people, we estimate that the total number of presentations created adds up to… um, a lot! Our team of professional designers work very hard to provide you with editable slides so that the only thing...
